
Step 0: Getting Started
We provide the full source code for the sample application discussed in this tutorial. You can download the sample source code we provide for review.Step 1: Use the Compatibility Package
Horizontal view paging is based upon APIs only available with the Android Compatibility package v4, Revision 3; these APIs are not available in the standard Android SDK at this time. Therefore, you will need to add the Android compatibility package to your Android project to access the appropriate APIs.To add the Android Compatibility package to your Eclipse Android project, right-click on the project in the Project Explorer. Choose Android Tools, Add Compatibility Library. You will now see the android-support-v4.jar file in your Referenced Libraries project folder. This means you have successfully added the package to your project and can now start using it.
Step 2: Define a ViewPager
Next, you’ll need to define a ViewPager control in your layout resource file. In our simple example, we update the main.xml layout resource used by our Activity class, and define a ViewPager control within that layout. This control must be referenced by its fully-qualified name: android.support.v4.view.ViewPager.For example, here’s the updated main.xml layout resource with a ViewPager defined:
<?xml version="1.0" encoding="utf-8"?> android:orientation="vertical" android:layout_width="fill_parent" android:layout_height="fill_parent"><android.support.v4.view.ViewPager android:layout_width="match_parent" android:layout_height="match_parent" android:id="@+id/myfivepanelpager"/></LinearLayout> |
Step 3: Create Page Layout Resources
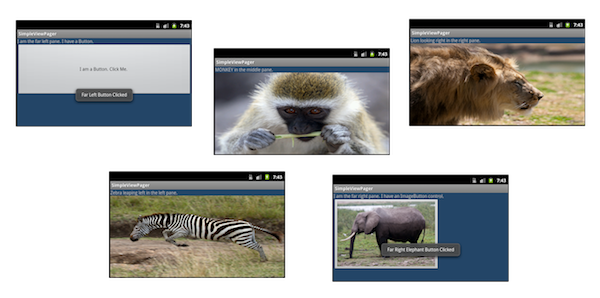
Next, you’ll want to create a set of resources that will make up the “pages” or “panes” for horizontal swiping. You can use the same layout resource file for each page and add different content, or you can load completely different layout resources for the individual pages. For this example, we created five separate layout resource files, called farleft.xml, left.xml, middle.xml, right.xml, and farright.xml. Each layout resource has different contents to display. The contents of each layout resource are up to you. You can use static or dynamic controls. To keep this example simple, we’ll stick with static controls like TextView and ImageView controls. For the far left and far right pages, we’ll include some Button controls.This image shows the five different layout resource file results:
Step 4: Implement a Custom PagerAdapter
Your ViewPager needs a data adapter to determine and load the appropriate content for each page the user swipes to. We have named our layout resource file “pages” in the order we want them to display, from far left to far right.When you extend the PagerAdapter class, you’ll need to implement several key methods.
First, you’ll need to define the size of your paging range. In this case, we have a set of five pages to display. Therefore, you’ll want the getCount() method of the MyPagerAdapter class to return a page size of 5.
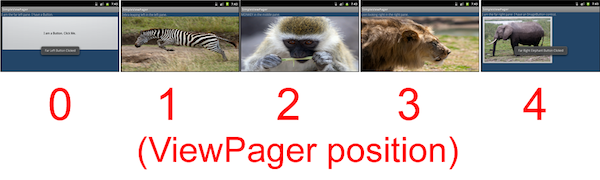
Next, you need to implement the instantiateItem() method to inflate the appropriate layout resource file, depending on the user’s swipe position. The farthest page to the left is in position 0, the next page to the right is position 1, and so on. The instantiateItem() method uses the LayoutInflater service to inflate the specific layout and add it to the collection used by the ViewPager.
This image shows the five different layout resource files and their “positions” in the terms of paging order:
Here is a basic implementation for a five-page horizontal pager adapter, called MyPagerAdapter, which implements these core methods as well as a few others:
private class MyPagerAdapter extends PagerAdapter { public int getCount() { return 5; } public Object instantiateItem(View collection, int position) { LayoutInflater inflater = (LayoutInflater) collection.getContext() .getSystemService(Context.LAYOUT_INFLATER_SERVICE); int resId = 0; switch (position) { case 0: resId = R.layout.farleft; break; case 1: resId = R.layout.left; break; case 2: resId = R.layout.middle; break; case 3: resId = R.layout.right; break; case 4: resId = R.layout.farright; break; } View view = inflater.inflate(resId, null); ((ViewPager) collection).addView(view, 0); return view; } @Override public void destroyItem(View arg0, int arg1, Object arg2) { ((ViewPager) arg0).removeView((View) arg2); } @Override public boolean isViewFromObject(View arg0, Object arg1) { return arg0 == ((View) arg1); } @Override public Parcelable saveState() { return null; }}Step 5: Bind MyPagerAdapter
Lastly, you need to update the onCreate() method of your Activity class to bind your MyPagerAdapter to the ViewPager control defined in your main.xml layout resource file.You can also take this time to set the initial position of the pager. By default, it would start at position 0 (the far left layout with the simple Button control). However, we want to allow the user to swipe left and right so we set the initial position of the ViewPager to the middle layout (the monkey in the middle) using the setCurrentItem() method.
@Overridepublic void onCreate(Bundle savedInstanceState) { super.onCreate(savedInstanceState); setContentView(R.layout.main); MyPagerAdapter adapter = new MyPagerAdapter(); ViewPager myPager = (ViewPager) findViewById(R.id.myfivepanelpager); myPager.setAdapter(adapter); myPager.setCurrentItem(2);} |

Conclusion
The horizontal view pager user interface control is a neat user interface control made available to Android developers through the Android compatibility package. Data for the individual “pages” is managed by a special data adapter called a PagerAdapter. There are also classes within the compatibility library for building fragment-compatible data adapters for driving ViewPager controls.From: tutplus.com


0 comments
Thanks for your comment