
Android developers must target a variety of different Android devices
in order to reach the greatest number of users. By properly configuring
the Android Emulator to mimic the behavior of different devices,
developers can save valuable time and money on testing and identify
incompatibilities. In this tutorial, you will learn how to create
Android Virtual Device (AVD) configurations for a variety of popular
Android devices on the market today. Specifically, you will create AVD configurations for the:
You can launch the Android SDK and AVD Manager from the Eclipse toolbar by pressing the button with the green Android icon with the arrow ( ) or by choosing Window->Android SDK and AVD Manager.
The important specs of this device from an Emulator perspective are:
 You have now created an AVD that can be used by the Android Emulator
to closely resemble and behave like the HTC Evo 4G. If you launch an
Android application in emulator while this AVD, you can see that the
screen closely resembles the experience one would have on the actual
device. If you own one of these devices, you may immediately notice that
the screen doesn’t look the same (software-wise). The emulator does not
provide third-party add-ons, such as the HTC Sense UI.
You have now created an AVD that can be used by the Android Emulator
to closely resemble and behave like the HTC Evo 4G. If you launch an
Android application in emulator while this AVD, you can see that the
screen closely resembles the experience one would have on the actual
device. If you own one of these devices, you may immediately notice that
the screen doesn’t look the same (software-wise). The emulator does not
provide third-party add-ons, such as the HTC Sense UI.
The important specs of this device from an Emulator perspective are:
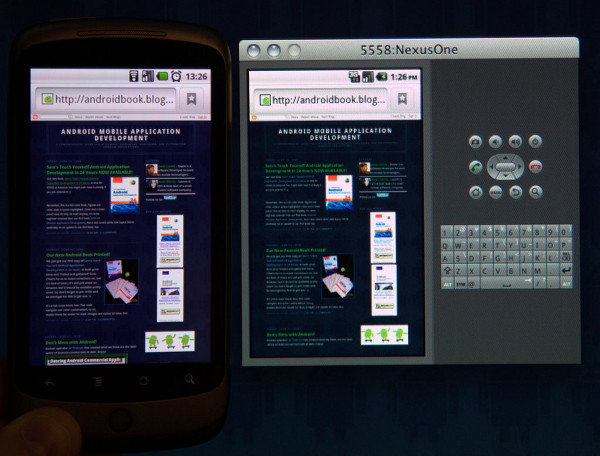
 You have now created an AVD that can be used by the Android Emulator
to closely resemble and behave like the Google Nexus One. If you launch
an Android application in emulator while this AVD, you can see that the
screen closely resembles the experience one would have on the actual
device. Here we see a photo that shows the Android Emulator using the
NexusOne AVD on the right and an actual Nexus One on the left.
You have now created an AVD that can be used by the Android Emulator
to closely resemble and behave like the Google Nexus One. If you launch
an Android application in emulator while this AVD, you can see that the
screen closely resembles the experience one would have on the actual
device. Here we see a photo that shows the Android Emulator using the
NexusOne AVD on the right and an actual Nexus One on the left.
The important specs of this device from an Emulator perspective are:
 You have now created an AVD that can be used by the Android Emulator
to closely resemble and behave like the Motorola Droid. If you launch an
Android application in emulator while this AVD, you can see that the
screen closely resembles the experience one would have on the actual
device.
You have now created an AVD that can be used by the Android Emulator
to closely resemble and behave like the Motorola Droid. If you launch an
Android application in emulator while this AVD, you can see that the
screen closely resembles the experience one would have on the actual
device.
50% of activated devices are still running Android 1.5 and Android 1.6—a good indication that G1s and other early Android handsets are still being used.
The important specs of this device from an Emulator perspective are:
 You have now created an AVD that can be used by the Android Emulator
to closely resemble and behave like the T-Mobile G1. If you launch an
Android application in emulator while this AVD, you can see that the
screen closely resembles the experience one would have on the actual
device.
You have now created an AVD that can be used by the Android Emulator
to closely resemble and behave like the T-Mobile G1. If you launch an
Android application in emulator while this AVD, you can see that the
screen closely resembles the experience one would have on the actual
device.
The important specs of this device from an Emulator perspective are:
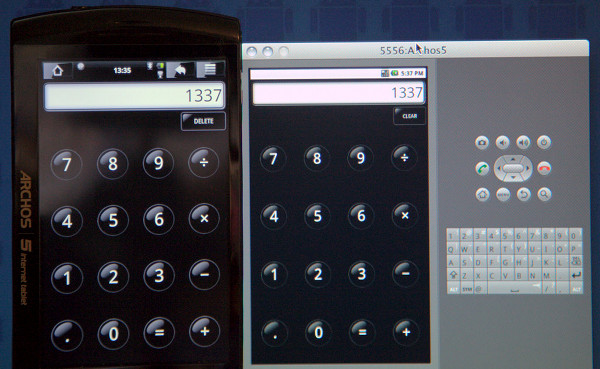
 You have now created an AVD that can be used by the Android Emulator
to closely resemble and behave like the Archos 5 Internet Tablet. If you
launch an Android application in emulator while this AVD, you can see
that the screen closely resembles the experience one would have on the
actual device. This next photo shows the Android Emulator using the
Archos5 AVD on the right and an actual Archos 5 Internet Tablet on the
left.
You have now created an AVD that can be used by the Android Emulator
to closely resemble and behave like the Archos 5 Internet Tablet. If you
launch an Android application in emulator while this AVD, you can see
that the screen closely resembles the experience one would have on the
actual device. This next photo shows the Android Emulator using the
Archos5 AVD on the right and an actual Archos 5 Internet Tablet on the
left.
 If you want to be able to control the on-screen size of the emulator,
you’ll need to use the “Start…” button from the Device Chooser or from
the Android SDK and AVD Manager. You’ll see the following dialog:
If you want to be able to control the on-screen size of the emulator,
you’ll need to use the “Start…” button from the Device Chooser or from
the Android SDK and AVD Manager. You’ll see the following dialog:
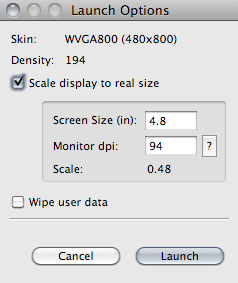 Be sure to choose the correct numbers for your desktop display and
the device screen size. On my 24” monitor that has a display resolution
of 1920×1200, the dpi is 94. You’ll need to calculate this for your own
monitor or laptop screen.
Be sure to choose the correct numbers for your desktop display and
the device screen size. On my 24” monitor that has a display resolution
of 1920×1200, the dpi is 94. You’ll need to calculate this for your own
monitor or laptop screen.
Finally, the SD card size directly takes up that much space on your computer. Make sure you use an SD card size that’s large enough for testing your application, but there is no real compelling need to emulate the SD card size exactly. The SD cards are user-replaceable, too, so you can’t guarantee that a user still has the original card in place. So, you have to decide which emulation is most important for you. In addition, the full emulation may be most useful when used with automated testing tools instead of by humans.
If you want more information about this articles click here.
- HTC Evo 4G
- Google/HTC Nexus One
- Motorola Droid
- T-Mobile/HTC G1
- Archos 5 Internet Tablet
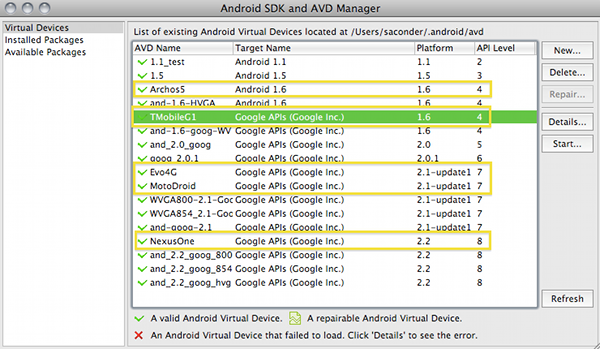
Step 1: Getting Comfortable with the Android SDK and AVD Manager
The Android SDK and AVD Manager is integrated into the Eclipse IDE when you install the Android Development Tools (ADT) plug-in. The Android SDK and AVD Manager is used to keep track of the different Android SDK targets installed on your development machine, as well as to manage the Android Virtual Devices (AVDs) used by the Android Emulator to mimic the behavior of real Android devices.
An Android Emulator must have an AVD configuration in order to function. An AVD represents a unique, persistent system image. Any Settings changed and applications installed while using the AVD within the Emulator will be stored within the system image.
An AVD configuration also describes how the emulator should emulate a real device, including:
- What version of the Android platform to emulate (API Level) (Note: The target platform is subject to change if, and when, devices receive over-the-air updates)
- Screen size, density, and resolution
- SD Card size and contents
- Hardware details (Camera? Keyboard? Trackball? D-Pad?)
You can launch the Android SDK and AVD Manager from the Eclipse toolbar by pressing the button with the green Android icon with the arrow (
) or by choosing Window->Android SDK and AVD Manager. Step 2: Creating an AVD to Emulate the HTC Evo 4G
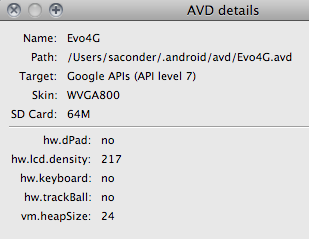
One of the newest Android devices on the market, the HTC Evo 4G is a powerful new phone with a nice big screen, a powerful processor, and a great camera.The important specs of this device from an Emulator perspective are:
- Target platform: Currently Android 2.1
- Screen info: Large screen, high density
- Lack of keyboard and DPad
- Lack of trackball
- Within Eclipse, launch the Android SDK and AVD Manager
- Select “Virtual Devices” from the left-hand options
- Click the “New” button to create a new AVD configuration
- Name the AVD: “Evo4G”
- Select the Target: “Google APIs API Level 7”
- Input the SD Card Size: “8GB”
- Input the Skin Details: “800×480”
- Edit the Hardware Property for Abstracted LCD Density: “217”
- Add another Hardware Property for DPad Support: “No”
- Add another Hardware Property for Keyboard Support: “No”
- Add another Hardware Property for Track-ball Support: “No”
- Save the AVD
Step 3: Creating an AVD to Emulate the Google Nexus One
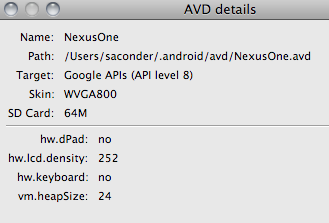
Google’s Nexus One is a powerful phone with the latest Android release. Being a device originally sold directly by Google, this phone seems to get updates the soonest. It also has a nice screen and is quite fast, especially with Android 2.2.The important specs of this device from an Emulator perspective are:
- Target platform: Currently Android 2.2
- Screen info: Medium sized, high density
- No keyboard or DPad
- Has track-ball
- Within Eclipse, launch the Android SDK and AVD Manager
- Select “Virtual Devices” from the left-hand options
- Click the “New” button to create a new AVD configuration
- Name the AVD: “NexusOne”
- Select the Target: “Google APIs API Level 8”
- Input the SD Card Size: “4GB”
- Input the Skin Details: “WVGA800” (800×480)
- Add a Hardware Property for Abstracted LCD Density: “252”
- Add another Hardware Property for DPad Support: “No”
- Save the AVD
Step 4: Creating an AVD to Emulate the Motorola Droid
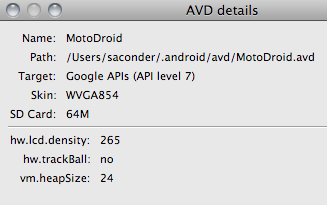
The Motorola Droid is one of the most prevalent Android phones available in the United States today. It’s also different from many of the other newer Android handsets in that it has a hardware keyboard.The important specs of this device from an Emulator perspective are:
- Target platform: Currently Android 2.1.
- Screen info
- Lack of trackball support
- Has keyboard and DPAD
- Within Eclipse, launch the Android SDK and AVD Manager
- Select “Virtual Devices” from the left-hand options
- Click the “New” button to create a new AVD configuration
- Name the AVD: “MotoDroid”
- Select the Target: “Google APIs API Level 7”
- Input the SD Card Size: “16GB”
- Input the Skin Details: “WVGA854”
- Edit the Hardware Property for Abstracted LCD Density: “265”
- Add another Hardware Property for Track-ball Support: “No”
- Save the AVD
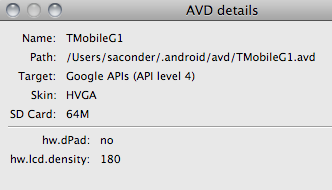
Step 5: Creating an AVD to Emulate the T-Mobile G1
The T-Mobile G1 was the first publicly available Android handset. Although many users have upgraded to the newer Android devices, many G1s are still around. In fact, as of this writing, a good50% of activated devices are still running Android 1.5 and Android 1.6—a good indication that G1s and other early Android handsets are still being used.
The important specs of this device from an Emulator perspective are:
- Target platform: Google add-ons with Android 1.6
- Screen info: medium density and small
- Has keyboard and Track-ball, but no DPad
- Within Eclipse, launch the Android SDK and AVD Manager
- Select “Virtual Devices” from the left-hand options
- Click the “New” button to create a new AVD configuration
- Name the AVD: “TMobileG1”
- Select the Target: “Google APIs API Level 5”
- Input the SD Card Size: “2GB”
- Input the Skin Details: “HVGA” (480×320)
- Edit the Hardware Property for Abstracted LCD Density: “180”
- Add a Hardware Property for DPad Support: “No”
- Save the AVD
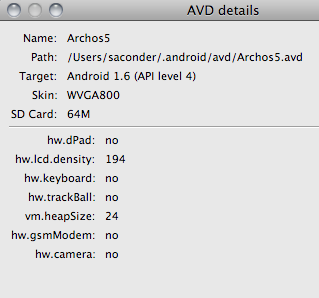
Step 6: Creating an AVD to Emulate the Archos 5 Internet Tablet
Finally, let’s look at an Android device that isn’t a phone. One good option is the Archos 5 Internet Table. Developing for other types of Android devices has its own set of challenges. Without the Google Add-ons, you can’t rely on any particular apps being present. For instance, the Google Maps app won’t be available. The device may still have a Maps app, but you won’t necessarily know how it will behave. Testing without these apps present, as you can do with the emulator, is highly recommended so you know if the application is making assumptions that it shouldn’t.The important specs of this device from an Emulator perspective are:
- Target platform: Android 1.6, but no Google Add-ons
- Screen info: High Density and Large
- No keyboard
- No Google APIs
- No Camera
- Within Eclipse, launch the Android SDK and AVD Manager
- Select “Virtual Devices” from the left-hand options
- Click the “New” button to create a new AVD configuration
- Name the AVD: “Archos5”
- Select the Target: “Android 1.6 API Level 5”
- Input the SD Card Size: “2GB”
- Input the Skin Details: “WVGA800”
- Edit the Hardware Property for Abstracted LCD Density: “194”
- Add a Hardware Property for DPad Support: “No”
- Add another Hardware Property for Track-ball Support: “No”
- Add another Hardware Property for Keyboard Support: “No”
- Add another Hardware Property for Camera Support: “No”
- Add another Hardware Property for GSM modem Support: “No”
- Save the AVD
Step 7: Using a Specific AVD with the Android Emulator
In order to use the AVDs you have created, you need to launch the Android Emulator, assigning it the appropriate AVD. The easiest way to do this from within Eclipse is to choose an Android project and update its Debug or Run Configuration to Target either Manual mode or a specific AVD by name. When you run or debug the application, the appropriate AVD will be loaded (if you chose one) or you will be prompted to manually choose an appropriate AVD from the Android Device Chooser, as shown below.
Step 8: Being Practical
Although you can now emulate a device in a far more realistic way, there are certain disadvantages to doing this. First, you’re still only just emulating, as we discussed. Second, and more importantly, some of these settings make using the emulator much more difficult. For instance, if you choose to turn off the keyboard, the emulator will honor that and you’ll be forced to use the on-screen keyboard within Android. Also, if you turn off GSM hardware, you will have no way of making a data connection as the Wi-Fi option does not work, either.Finally, the SD card size directly takes up that much space on your computer. Make sure you use an SD card size that’s large enough for testing your application, but there is no real compelling need to emulate the SD card size exactly. The SD cards are user-replaceable, too, so you can’t guarantee that a user still has the original card in place. So, you have to decide which emulation is most important for you. In addition, the full emulation may be most useful when used with automated testing tools instead of by humans.
If you want more information about this articles click here.


0 comments
Thanks for your comment